This guide is no longer being updated.
See the ThinkPad X220 Mojave guides hereThinkPad X220 macOS Sierra 10.12 Installation Guide
Follow these steps to perform a clean installation of macOS Sierra 10.12 on your ThinkPad X220 or X220 Tablet with an Intel Core i3, i5 or i7 CPU.
Most macOS Sierra features are fully functional on the ThinkPad X220. See the Not Functioning section of the Notes and Suggestions at the bottom of this page for the latest status.
- If you already have OS X 10.11 El Capitan or OS X 10.10 Yosemite on your X220 we recommend a clean installation of macOS Sierra, not an update from the existing installation.
- See the guide here to install OS X 10.11 El Capitan on the ThinkPad X220.
- See the guide here to install OS X 10.10 Yosemite on the ThinkPad X220.
- See the guide here to dual-boot macOS and Windows.
- Please use our contact form if you find anything that isn’t accurate.
PART 1 OF 4: ADJUST BIOS SETTINGS
- Install the modified BIOS version 1.46 to remove the whitelist check and permit the installation of a Wi-Fi card compatible with macOS. This modified BIOS will also enable advanced settings and improve battery life under macOS.
– MD5: 4a769c4f17e8aa0dc0e6927ebe75635d
– To install this modified BIOS from a bootable USB drive, see the instructions here.
– Please note the warning on the Advanced menu in the BIOS: Setting items on this screen to incorrect values may cause the system to malfunction! The default values will work fine but the wrong settings can prevent your X220 from booting.
Wi-Fi card recommendations:- Stock Wi-Fi cards in the X220 are not compatible with macOS
- Wi-Fi cards that require no configuration whatsoever and will work automatically in macOS:
- Dell DW1510 – 802.11a/b/g/n 2.4 GHz & 5 GHz (Broadcom)
or - Dell DW1515 – 802.11a/b/g/n 2.4 GHz & 5 GHz (Atheros)
- Dell DW1510 – 802.11a/b/g/n 2.4 GHz & 5 GHz (Broadcom)
- For 802.11ac + Bluetooth as well as Continuity/Handoff support, it may be possible to make the AzureWave AW-CE123H (aka Dell DW1550) card work by following the steps in the guide here. Another guide that might be helpful is available here. Note that it will not be possible to boot from our standard USB installer with this card installed; only install this card after the macOS installation is complete and the necessary modifications have been made.
- Various other Mini PCIe and USB Wi-Fi adapters compatible with macOS are listed here
.
- Press F1 at startup to set the BIOS settings as follows:
– Restart > Load Setup Defaults
– Config > Power > Power On with AC Attach > Disabled
– Config > Serial ATA (SATA) > SATA Controller Mode Option > AHCI
– Security > Memory protection > Execution Prevention > Enabled
– Startup > UEFI/Legacy Boot > Both
.
PART 2 OF 4: CREATE USB INSTALLER
. - Download the Install macOS Sierra app from the App Store
- Insert an 8GB or larger USB disk
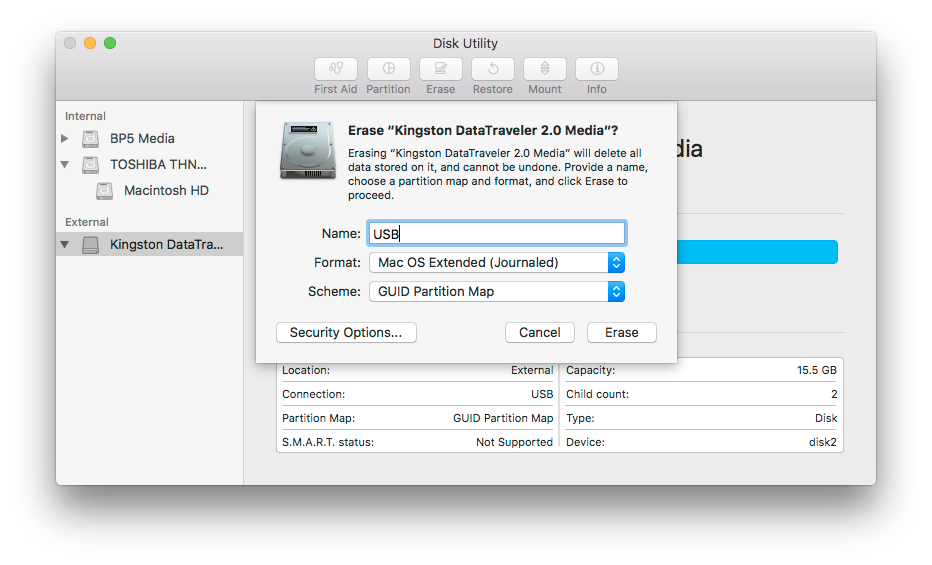
- Open Applications > Utilities > Disk Utility
– Select the USB disk in the left pane (select the physical disk, not a volume on the disk)
– Click the Erase button
– Under Name: type USB
– Under Format: select Mac OS Extended (Journaled)
– Under Scheme select GUID Partition Map
– Click Erase
- Open Applications > Utilities > Terminal and enter the following command:
sudo /Applications/Install\ macOS\ Sierra.app/Contents/Resources/createinstallmedia --volume /Volumes/USB --applicationpath /Applications/Install\ macOS\ Sierra.app --no interaction
- Enter your password when prompted
- After approximately 25-35 minutes the process will finish and the USB will be renamed Install macOS Sierra (wait for the “copy complete” message in the Terminal before continuing)
- Download the ThinkPad X220 macOS Sierra Utility and Kext Pack and place a copy on your installation USB
- Launch Clover Configurator from the Utility and Kext Pack and click Mount EFI
- Click the Mount Partition button to the right of the EFI partition of your USB. It will appear as EFI on EFI, Install macOS Sierra (disk*s1)
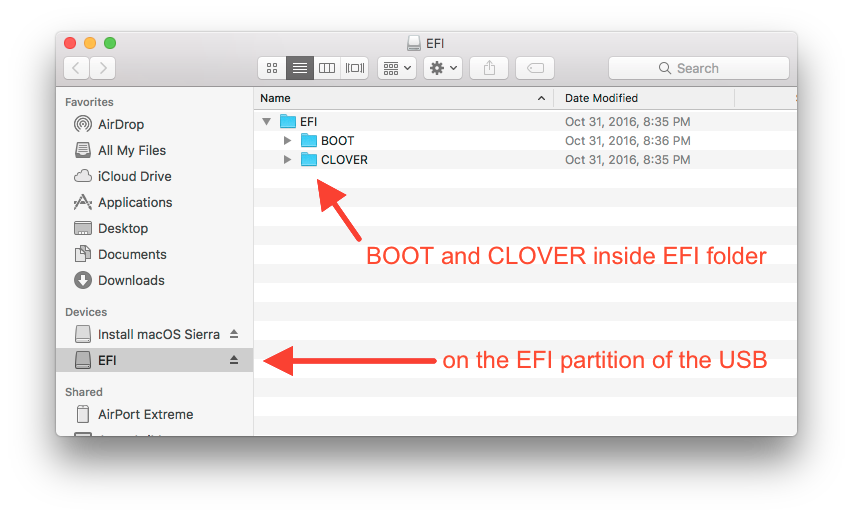
- Quit Clover Configurator and copy the entire EFI folder from the Utility and Kext Pack to the EFI partition of your USB, replacing the existing folder if present.
The EFI partition on your USB should now contain a single folder named EFI that contains two folders: BOOT and CLOVER. It should look like this:
- Eject your USB
.
PART 3 OF 4: INSTALL macOS SIERRA
. - Disconnect any external monitors or other devices and place the USB installer in a USB 2.0 port of your ThinkPad X220. Press F12 at startup to select the USB as your boot disk
- Use the arrow keys to select Boot OS X Install from Install macOS Sierra at the Clover bootloader menu and press Enter
- From the macOS Utilities screen, launch Disk Utility then select your target disk (select the physical disk, not a volume on the disk) and click Erase
- Name the target disk Macintosh HD, select OS X Extended (Journaled) format, GUID Partition Map scheme and click Erase
- After the erase process finishes:
– Quit Disk Utility
– From the top menu select Utilities > Terminal
– Enter the following command to set the system date to 01/01/2018:
date -u 0101010118
– Quit Terminal
– Select select Install macOS and follow the prompts to do a standard macOS installation on Macintosh HD - The install process will progress very slowly and the estimated time remaining will be inaccurate. Just wait – it may take up to an hour finish (if the screen dims you can press a key to wake it)
- The computer will eventually restart. When it does, press F12 to select the USB as your boot disk and then select Boot macOS from Macintosh HD at the Clover bootloader menu.
(If Macintosh HD does not show in the menu just select the Install macOS Sierra disk again – it is normal for the installer to trigger a reboot during the installation process) - Complete the guided macOS setup but do not turn on FileVault Disk Encryption – this will prevent the computer from booting.
.
PART 4 OF 4: POST INSTALL
. - Copy the Utility and Kext Pack to your Desktop and eject the USB installer
- Open Applications > Utilities > Terminal and enter the following command to allow apps downloaded from unidentified developers:
sudo spctl --master-disable
- Launch Clover Configurator from the Utility and Kext Pack and click Mount EFI
- Click the Mount Partition button to the right of the EFI partition of your hard drive. It will appear as EFI on EFI, Macintosh HD, Recovery HD (disk*s1)
- The EFI partition for Macintosh HD should now be mounted and show in the sidebar under Devices when you open a Finder window
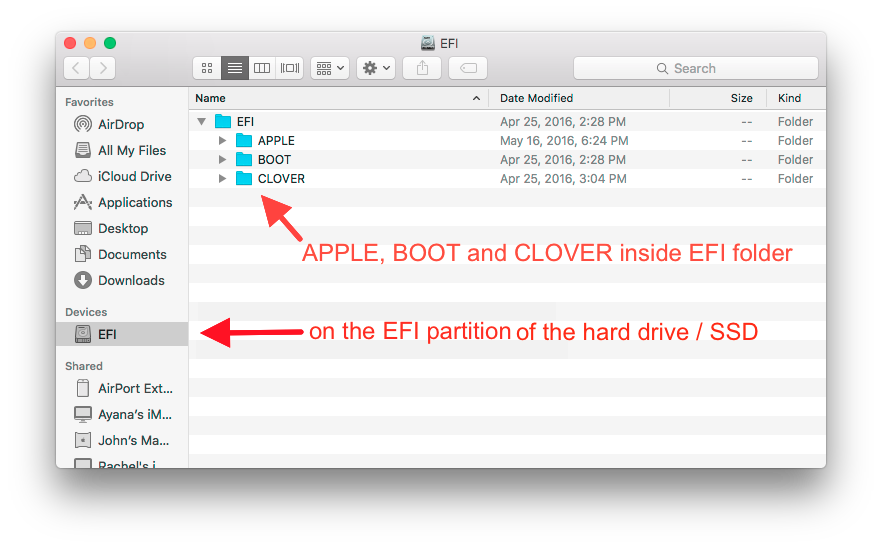
- Copy the folders named BOOT and CLOVER from the EFI folder in the Utility and Kext Pack to the EFI folder on the EFI partition of Macintosh HD.
The EFI partition should now contain a single folder named EFI that contains three folders named APPLE, BOOT and CLOVER. It should look like this:
- Open Utility and Kext Pack > EFI > CLOVER > kexts and launch the script entitled _kext-install.command
- Enter your password when prompted and wait for the process completed message after the script has installed the kexts
- Confirm the installation USB has been removed and restart the computer
- Install any Sierra system updates available from Apple through Software Update and take a moment to read through the Notes and Suggestions section below
- Recommended additional steps to improve battery life with optimized CPU power management:
- Confirm that you have an active connection to the Internet
- Open Applications > Utilities > Terminal then copy and paste the following command in the Terminal window and hit Enter:
curl -o ~/ssdtPRGen.sh https://raw.githubusercontent.com/Piker-Alpha/ssdtPRGen.sh/master/ssdtPRGen.sh
- Next, paste this command in the Terminal window and hit Enter:
chmod +x ~/ssdtPRGen.sh
- Finally, paste this command in the Terminal window and hit Enter:
./ssdtPRGen.sh
- Answer ‘N’ to the questions about copying and opening the ssdt files
- A customized SSDT.aml for your specific machine will now be in the directory /Users/yourusername/Library/ssdtPRGen
- Copy SSDT.aml to /Volumes/EFI/EFI/CLOVER/ACPI/patched/
(you may need to run Clover Configurator to mount the EFI partition) - Restart the computer
Notes and Suggestions
- Reviews of this Guide
- Fair Logic’s video demonstration on YouTube – September 3, 2106
- Pyroisonfireee’s review on Reddit – June 24, 2016
- imtony’s video demonstration on YouTube – March 15, 2016
- General Suggestions
- Do not encrypt your boot drive with FileVault. Doing so will prevent the system from booting correctly.
- Keep your installation USB on hand. After installing macOS system updates it is sometimes necessary to boot the system with the USB and re-install kexts to get everything working properly again.
- Use Clover Configurator if you need to mount the EFI partition
- Using Clover Configurator to edit the default config.plist is not recommended. This program will automatically and without warning makes changes to the default settings in the <key>ACPI</key> section that will prevent the system from booting. If edits are needed, open config.plist with TextEdit and follow the format explained here.
- If a kernel panic occurs, boot from the installation USB, select the installation drive, hit the space bar and select Boot Mac OS X in safe mode to successfully boot and make necessary changes.
- USB adapters for wireless mice or keyboards may trigger a restart when attempting to shut down. The only known solution is to remove the USB adapter before shutting down.
- Default sleep settings may cause a 20-25 second delay in sleeping and waking. To reduce this delay the hibernatemode setting can be changed to mode 0 by entering the following command in Applications > Utilities > Terminal:
sudo pmset -a hibernatemode 0
- If you are encountering a black screen when waking from sleep, add darkwake=8 to the Arguments section of the Clover config.plist. Edits to the Clover config.plist can be made using the TextEdit application and following the format explained here.
- If you are seeing duplicate entries for your macOS drive in the Clover menu, this means the installer may have created a logical volume. This can be reverted back to a physical volume by following the simple steps here.
- If System Information indicates no TRIM Support for your SSD, update your drive with the latest firmware and then enable TRIM by entering the following command in Applications > Utilities > Terminal:
sudo trimforce enable
- Touchpad, TrackPoint and Tablet Input
- Touchpad and TrackPoint use a version of RehabMan’s VoodooPS2Controller.kext modified by tluck for the ThinkPad T420 in the guide here.
- Turn off the touchpad with the <PrtSc> key if you will only be using the TrackPoint – this will prevent an issue with unintentional double-clicks with the TrackPoint buttons.
- Touchpad supports three-finger swipe right and left (forward and back) in Finder, Safari and other browsers as well as three-finger swipe up for Mission Control and three-finger swipe down for App Exposé.
- For X220 Tablet models, pen input should already work, however pressure sensitivity does not register correctly. For touch input, install ControllerMate and use one of the following ControllerMate scripts:
- TouchSierra written by jakibaki. Jakibaki’s script also adds some gestures including swipe from top to get Mission Control, swipe from bottom for Launchpad and swipe from left/right to switch workspaces.
- NewTouchSierra written by Jpeezzy. Jpeezzy’s script enables additional touch input and supports click and drag functionality.
- Special Keys
- The <PrtSc> key toggles the touchpad on and off
- The <ScrLk> and <Pause> keys adjust screen brightness as do the standard <Fn>+<Home> and <Fn>+<End> keys
- The <Insert> key will eject the CD/DVD drive (attached by USB or docking station)
- The <Windows> key functions as the macOS <Option> key
- The <Alt> key functions as the macOS <Command> key
- The <Fn> key is used as follows:
<Fn>+<F4> puts the computer to sleep
<Fn>+<ScrLk> toggles NmLk (to use the right side of the keyboard as a number pad)
<Fn>+<Home> brightness up
<Fn>+<End> brightness down
<Fn>+<PgUp> toggles ThinkLight
- Video / Displays
- If screen brightness controls are not working, remove AppleBacklightInjector.kext from /Library/Extensions, run Kext Utility and then restart the computer.
If you continue to encounter problems with brightness control, try creating a version of AppleBacklightInjector.kext customized for your hardware configuration using the script available from RehabMan here. - If you are encountering a black screen when waking from sleep, edit the Clover config.plist and add the boot argument darkwake=8
- To enable scaled resolutions of 1536 x 864 and 1920 x 1080 on the stock LCD panel, follow the steps here
- Video output through VGA, DisplayPort and docking stations works normally for single external monitor configurations (internal LCD + one external monitor)
- If an external monitor is not automatically detected, open System Preferences > Displays and press the Option key (the <Windows> key on the X220 keyboard). This will show a Detect Displays button which should make the external monitor show up immediately.
- External monitors connected to the VGA port should be connected and powered on before booting the computer.
- If an external monitor is attached to the VGA port and the internal display remains dark, try increasing brightness with the <Fn>+<Home> keys.
- If you have installed a FHD (1920×1080) panel it may be necessary to remove the Replace 4th port with VGA patch in the Clover config.plist and install a custom EDID in /System/Library/Displays
- To enable Night Shift, run macOS Night Shift Enabler.mpkg located in the Utility and Kext Pack. Original source is here.
- If screen brightness controls are not working, remove AppleBacklightInjector.kext from /Library/Extensions, run Kext Utility and then restart the computer.
- Miscellaneous
- To enable USB 3.0 on Core i7 X220 systems, download GenericUSBXHCI.kext here and place in /System/Library/Extensions and on your EFI partition in EFI/CLOVER/kexts/Other. Then run Kext Utility to repair file permissions and rebuild the boot cache.
- To enable docking station headphone and microphone ports, use the alternate AppleHDA_20672.kext available here. Simply place this alternate version in Utility and Kext Pack > EFI > CLOVER > kexts > Other and repeat steps 28-30 above. Note that the combo audio jack on the right side of the computer will not function correctly with this alternate AppleHDA_20672.kext – we are working on a solution to this.
- DW1510 wireless cards can be rebranded to identify as native Apple AirPort Extreme cards by following the steps here
- Time Machine can be used to back up and restore your X220. Complete the restore process by booting from the installation USB and repeating steps 24 – 27 (and optionally step 32) to restore the contents of the EFI partition. SuperDuper is another good backup solution.
- HWSensors provides a convenient way to monitor the status of your system from the menu bar
- Smart Scroll can be installed to enable middle-button TrackPoint scrolling even when the touchpad is disabled
- Ukelele or Karabiner-Elements can be installed to create customized keyboard layouts
- If the Bluetooth radio is turned off in Windows or Linux it may no longer show up when booting into macOS. Boot back into Windows or Linux to turn the Bluetooth radio back on.
- If Messages (iMessage) does not work correctly, see the guide here
- To enable Ericsson HSPA + (F5521gw) WWAN card see the discussion here
- Custom “OS X220” desktop wallpaper by Will is available here
- Sources / Credits
- Not functioning
- SD Card reader
- Fingerprint reader
- Microphone mute button on top of keyboard
- For X220 Tablet models, pen pressure sensitivity does not register correctly (see the Touchpad, TrackPoint and Tablet Input section above for additional information)
macOS SIERRA UPDATES
- macOS Sierra Update 10.12.6 – installs with no issues. If you previously enabled Night Shift, it will be necessary to enable it again.
- macOS Sierra Update 10.12.5 – installs with no issues. If you previously enabled Night Shift, it will be necessary to enable it again.
- macOS Sierra Update 10.12.4 – installs with minor issues. Download the current Utility and Kext Pack and repeat steps 25-33 to correct an issue with screen brightness control. Be sure to first backup your Clover config.plist if you made any changes to the default version.
Note: If you continue to have trouble with screen brightness control, see the suggestions in the Video / Displays section of the notes at the end of the guide. - macOS Sierra Update 10.12.3 – installs with no issues.
- macOS Sierra Update 10.12.2 – installs with no issues.
- macOS Sierra Update 10.12.1 – installs with no issues. This update resolves the issue with the keyboard volume increase/decrease buttons.
INSTALLATION GUIDE UPDATES
- 06/28/2018: Updated link to latest version of modified BIOS v1.46 source
- 06/06/2018: Updated link to latest version of modified BIOS v1.45 source
- 07/04/2017: Updated Utility and Kext Pack with new versions of Clover, Clover Configurator and installer to enable Night Shift.
- 05/15/2017: Updated Utility and Kext Pack with modified VoodooPS2Controller.kext with improved gesture support (thanks to Henry López del Pino), new dsdt.aml for better fan speed regulation, as well as newer versions of Clover and Clover Configurator.
- 04/09/2017: Updated Utility and Kext Pack with new dsdt.aml and AppleBacklightInjector.kext for better range of screen brightness as well as improved kext installation script and new version of Clover Configurator.
- 03/27/2017: Updated Utility and Kext Pack with AppleBacklightInjector.kext to fix brightness control issue with 10.12.4 update as well as newer version of Clover and Clover Configurator. Removed obsolete IntelBacklight.kext.
- 01/23/2016: Updated Utility and Kext Pack with BlueTooth_Injector.kext to fix BlueTooth on/off functionality, new version of VoodooPS2Controller.kext and latest Clover Configurator. Removed obsolete BroadcomBluetooth.kext.
- 12/29/2016: Updated Utility and Kext Pack with new version of VoodooPS2Controller.kext that improves middle button function, gestures and fixes <Fn>+<Home/End> to adjust screen brightness. Also updated FakeSMC.kext as well as various Clover bootloader files.
- 11/26/2016: Updated Utility and Kext Pack with new versions of Clover Configurator and the following kexts: ACPIBatteryManager, FakeSMC, IntelBacklight, IntelMausiEthernet, VoodooPS2Controller. No significant changes or improvements.
- 11/22/2016: Updated link to latest version of modified BIOS
- 11/15/2016: Updated Utility and Kext Pack with new version of VoodooPS2Controller.kext that corrects unintentional clicks when scrolling with the TrackPoint
- 11/12/2016: Updated Utility and Kext Pack with new version of VoodooPS2Controller.kext that corrects <CapsLk> issue.
- 11/08/2016: Updated Utility and Kext Pack with new version of VoodooPS2Controller.kext that improves trackpad scrolling
- 11/03/2016: Updated Utility and Kext Pack with new version of VoodooPS2Controller.kext that corrects numerous Trackpad issues. Removed steps for installing the now-obsolete patched Trackpad prefPane. A stock unmodified macOS Sierra Trackpad prefPane is available here if you previously installed the patched version in System/Library/PreferencePanes.
- 09/25/2016: Updated Utility and Kext Pack with new version of Clover Configurator. Added post-install step to enable apps downloaded from unidentified developers.
- 09/20/2016: Initial version of guide posted
![]() Independent reviews of the best ergonomic mice, keyboards, standing desks and alternative devices. Proceeds support the Purple Maiʻa Foundation technology education nonprofit.
Independent reviews of the best ergonomic mice, keyboards, standing desks and alternative devices. Proceeds support the Purple Maiʻa Foundation technology education nonprofit.