Dual Boot macOS and Windows from a single drive on the ThinkPad x220
Our main guide for dual booting from separate drives can be found here.
The steps below should allow you to dual boot macOS and Windows from a single drive on the X220.
- Install macOS by following the steps in the guide
- Obtain an installation ISO for whatever version of Windows you want to install
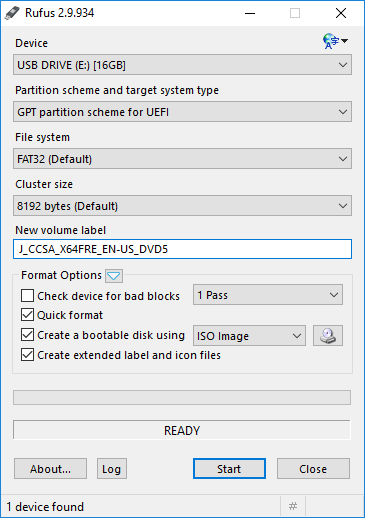
- On a computer running Windows, use Rufus to create a UEFI-bootable Windows installation USB using GPT partition scheme for UEFI and FAT32 file system as shown here:
.
. - Restart the X220 and press F1 to access the BIOS settings
- Select the Startup tab and set UEFI/Legacy Boot to UEFI Only and then Save and Exit
- Boot into macOS, open Applications > Utilities > Terminal and enter the following command:
diskutil list
- If the output from this command reveals a logical volume on your physical disk, revert the logical volume by following the steps here.
- After reverting any logical volumes, boot into macOS, open Applications > Utilities > Terminal and enter the command below.
– Change 125G to whatever portion of your drive (in gigabytes) you want to allocate to macOS. The remainder will be made available for Windows.
– If more than one drive is installed in your X220, use the diskutil list command to determine the correct disk number.diskutil resizeVolume /dev/disk0s2 125G– If you are using macOS High Sierra or later and have the APFS file system, you will need to instead use the following command to resize the APFS container:
sudo diskutil apfs resizeContainer disk0s2 125G - Boot from your Windows installation USB and select Custom: Install Windows only (advanced)
- The next window should ask: Where do you want to install Windows? Select the “Unallocated Space” and proceed with the installation.
- When the installation is complete, press F1 at startup to adjust the BIOS settings.
- Select Startup > UEFI/Legacy Boot and set it to Both. This will allow you to boot from non-UEFI drives if you ever need to do that.
- Select Startup > Boot and make Mac OS X the first entry in the Boot Priority Order. Press F10 to save and exit.
- The Cover boot menu should now appear and show entries for both macOS and Windows
Notes
- Some suggestions for configuring the Clover bootloader on the ThinkPad x220 are in the forum discussion here
- An assortment of themes beyond those available in the default Clover installation is available here.