This guide is no longer being updated.
See the ThinkPad X220 Mojave guides hereThinkPad X220 OS X 10.10 Yosemite Installation Guide
Follow these steps to install OS X 10.10 Yosemite on your ThinkPad x220 or x220 Tablet.
See the guide here to dual-boot OS X and Windows
Please use our contact form if you find anything that isn’t accurate.
- Install the modified BIOS version 1.46 to remove the whitelist check and permit the installation of a Wi-Fi card compatible with macOS. This modified BIOS will also enable advanced settings and improve battery life under macOS.
– MD5: 4a769c4f17e8aa0dc0e6927ebe75635d
– To install this modified BIOS from a bootable USB drive, see the instructions here.
– Please note the warning on the Advanced menu in the BIOS: Setting items on this screen to incorrect values may cause the system to malfunction! The default values will work fine but the wrong settings can prevent your X220 from booting.
Wi-Fi card recommendations:-
- Stock Wi-Fi cards in the X220 are not compatible with macOS
- Wi-Fi cards that require no configuration whatsoever and will work automatically in macOS:
- Dell DW1510 – 802.11a/b/g/n 2.4 GHz & 5 GHz (Broadcom)
or - Dell DW1515 – 802.11a/b/g/n 2.4 GHz & 5 GHz (Atheros)
- Dell DW1510 – 802.11a/b/g/n 2.4 GHz & 5 GHz (Broadcom)
- For 802.11ac + Bluetooth as well as Continuity/Handoff support, it may be possible to make the AzureWave AW-CE123H (aka Dell DW1550) card work by following the steps in the guide here. Another guide that might be helpful is available here. Note that it will not be possible to boot from our standard USB installer with this card installed; only install this card after the macOS installation is complete and the necessary modifications have been made.
- Various other Mini PCIe and USB Wi-Fi adapters compatible with macOS are listed here
.
-
- Press F1 at startup to set the BIOS settings as follows:
– Restart > Load Setup Defaults
– Config > Serial ATA (SATA) > SATA Controller Mode Option > AHCI
– Security > Memory protection > Execution Prevention > Enabled
– Security > Virtualization > Intel VT-d Feature > Disabled
– Startup > UEFI/Legacy Boot > Both - Create an installation USB with laptop support using UniBeast 5.2.0 by following steps 1 and 2 in the guide here
- Download the ThinkPad x220 OS X Yosemite Utility and Kext Pack and place a copy on your installation USB
- Download the Clover EFI bootloader installer and place a copy of the installer on your installation USB
- Boot from the installation USB (use a USB 2.0 port), hit the space bar to skip Bluetooth keyboard setup, and continue with step 4 in the UniBeast guide to do a standard OS X installation to your GUID-partitioned drive (no boot flags are necessary).
* Do not continue through any of the additional steps in the UniBeast guide * - After installation, start the computer with the installation USB and select the new installation drive at the bootloader menu (no boot flags are necessary)
- Complete the guided OS X setup
- Go to System Preferences > Bluetooth > Advanced… and uncheck both Open Bluetooth Setup Assistant options (this prevents an issue with these assistants popping up despite the functioning internal keyboard and trackpad)
- Go to System Preferences > Security & Privacy and select Allow apps downloaded from: Anywhere
- Open the Clover EFI bootloader installer, click Customize, select the following options and then click Install:
– Install for UEFI booting only
– Install Clover in the ESP
– Themes
– Drivers64UEFI > OsxAptioFixDrv-64
– Install RC scripts on target volume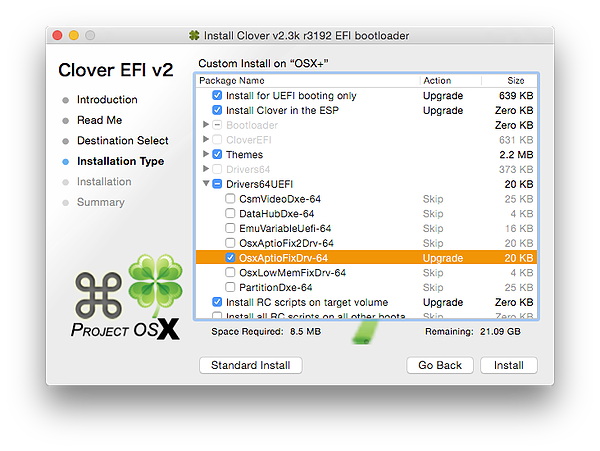
- Replace config.plist in /Volumes/EFI/CLOVER with the config.plist from the Utility and Kext Pack
- Copy dsdt.aml and ssdt.aml from the Utility and Kext Pack to /Volumes/EFI/CLOVER/ACPI/patched/
- Use the Kext Utility app to install all of the kexts included in the Utility and Kext Pack by selecting all of the kexts and then dragging and dropping them into the Kext Utility window.
- Eject the installation USB and restart the computer
- Install any Yosemite system updates available from Apple through Software Update and take a minute to read over the Notes and Suggestions section below
- Open the Terminal from Applications > Utilities > Terminal and enter the following command to make sleep function more consistently:
sudo pmset -a hibernatemode 0 - Install VoodooHDA-v2.8.4.pkg and then follow these steps to configure audio:
– Restart the computer
– Open System Preferences > Sound and verify that Output is set to “Speaker (Analog)” and Input is set to “Microphone (Digital)”
– Open System Preferences > VoodooHDA
– Set the top pulldown menu on the left side of the preference pane to “1:Speaker (Analog)”
– In the Mixer Controls section, the slider labled “PCM” should be set at about 80%
– In the Sound treatment section, check to box for “Use SSE2,” set Noise reduction to 0 and Stereo base to 0
– The Volume knob on the left side can be adjusted as necessary - Recommended additional steps to enable native CPU power management:
- Confirm that you have an active connection to the Internet
- Open Applications > Utilities > Terminal then copy and paste the following command in the Terminal window and hit Enter:
curl -o ~/ssdtPRGen.sh https://raw.githubusercontent.com/Piker-Alpha/ssdtPRGen.sh/master/ssdtPRGen.sh - Next paste this command in the Terminal window and hit Enter:
chmod +x ~/ssdtPRGen.sh - Finally paste this command in the Terminal window and hit Enter:
./ssdtPRGen.sh
Answer ‘N’ to the questions about copying and opening the ssdt files - A customized ssdt.aml for your specific machine will now be in the /Users/yourusername/Library/ssdtPRGen directory
– Quickly access this directory in the Finder by holding the Option key (Windows key) while selecting the Go menu and then selecting Library - Replace the existing ssdt.aml in /Volumes/EFI/EFI/CLOVER/ACPI/patched/ with the custom one you just created (you may need to run Clover Configurator to mount the EFI partition)
- Remove NullCPUPowerManagement.kext from /System/Library/Extensions/
– Quickly access this directory in the Finder by selecting the Go Menu > Go to Folder … and then type /System/Library/Extensions/ - Run the Kext Utility app to repair permissions and rebuild the kext cache
Notes and Suggestions
- Do not encrypt your boot drive with FileVault. Doing so will prevent the system from booting correctly.
- Keep your installation USB on hand. After installing Mac OS system updates it is sometimes necessary to boot the system with the USB and re-install kexts to get everything working properly again.
- Use Clover Configurator if you need to mount the EFI partition
- Using Clover Configurator to edit the default config.plist is not recommended. This program will automatically and without warning makes changes to the default settings in the <key>ACPI</key>section that will prevent the system from booting. If edits are needed, open config.plist with TextEdit and follow the format explained here.
- If a kernel panic occurs, boot from the installation USB, select the installation drive, hit the space bar and select Boot Mac OS X in safe mode to successfully boot and make necessary changes.
- For X220 Tablet models, pen input should already work properly. For touch input, install ControllerMate and use the script written by user jakibaki available here. Jakibaki’s script also adds some gestures including swipe from top to get Mission Control, swipe from bottom for Launchpad and swipe from left/right to switch workspaces.
- SuperDuper is an excellent free utility to create a full, bootable backup of your drive that can be restored later if necessary. Follow the steps here to make your backup bootable.
- HWSensors provides a convenient way to monitor the status of your system from the menu bar
- Original source of modified BIOS 1.46 is here
- Included config.plist was modified from the T420 version found here
- To enable scaled resolutions of 1536 x 864 and 1920 x 1080 on the stock LCD panel, follow the steps here
- Guide to editing dsdt.aml with MaciASL can be found here
- Included dsdt.aml was patched with RehabMan’s [bat] Lenovo x220 battery patch (addresses many issues with battery life calculation and recognition of battery vs adapter power) and RehabMan’s [igpu] Brightness fix (HD3000/HD4000) (allows adjustment of screen brightness). Source is here. RehabMan’s patches are here
- The <ScrLk> key decreases screen brightness, the <Pause> key increases screen brightness
- The <PrtSc> key toggles the touchpad on and off
- Custom ssdt.aml script source is here
- Source of IOUSBFamily.kext patch for USB 3.0 is here
- If the Bluetooth radio is turned off in Windows it may no longer show up when booting into OS X. Boot back into Windows to turn the Bluetooth radio back on.
- Fan noise can be reduced by changing the BIOS setting under Config > Power > Adaptive Thermal Management to Balanced
- Messages: should work fine without any modification
- FaceTime: If audio is muted, select the Video menu within FaceTime and then select Microphone (Digital)
Not functioning
- SD Card reader
- Fingerprint reader
- Microphone mute button on top of keyboard
.
OS X YOSEMITE UPDATES
- OS X 10.10.5 Update – installs with no issues
- OS X 10.10.4 Supplemental Update – installs with no issues
- OS X 10.10.3 Supplemental Update – installs with no issues
- OS X Yosemite Recovery Update v1.0 – installs with no issues
- OS X 10.10.3 Update – installs with no issues
INSTALLATION GUIDE UPDATES
- 06/28/2018: Updated link to latest version of modified BIOS v1.46 source
- 06/06/2018: Updated link to latest version of modified BIOS v1.45 source
- 11/22/2016: Updated link to latest version of modified BIOS
- 08/13/2016: Updated steps for new version of modified BIOS that allows security chip to be enabled
- 08/10/2016: Added information under Notes and Suggestions to enable touch input on tablet models
- 06/17/2016: Updated steps for new version of modified BIOS
- 12/30/2015: Updated link to improved version of modified BIOS
- 08/23/2015: Updated Utility and Kext Pack with new versions of IOUSBFamily.kext, Clover Configurator and Kext Utility
- 07/24/2015: Added guide to dual boot OS X and Windows
- 07/22/2015: Updated BIOS links for version 1.40
- 04/14/2015: Utility and Kext Pack updated to include a patched version of IOUSBFamily.kext to enable USB 3.0 on Core i7 systems
- 04/13/2015: Added details to steps 19 and 20 for configuring audio and enabling native CPU power management
- 03/26/2015: Utility and Kext Pack updated with a different version of the VoodooPS2Controller.kext providing much smoother operation of the TrackPoint stick.